This Project Consumed My Life

Let me tell you how I met Kevin Egan. While away on an 8-day retreat with total strangers, this guy approached me and said: “Dude! I know this is odd, but I really feel impressed to meet and talk to you. Can we get together after this session?” So, I said, yes. I soon learned that Kevin is a SUPER boisterous, VERY energetic visionary who loves people and loves to encourage them! After the session, we met in a side room, and he began telling me all the wild things he was hearing during our meditation time. It was a fun conversation; I was just grateful he wasn’t trying to sell me a time-share or recruit me to be in his down-line (Lol). After that, we ran into each other a few more times, and as a result, we became friends.

Sketch

On my last night, we were all together in an assembly, and I asked him: “So, Kevin, what do you do?” He freaked out and said: “Dude! We’ve been hanging out all week, and I haven’t even told you what I’m doing! I responded, “I know, right?!”” So, he tells me he is head of this ministry ministry called, Tower of Strength, and that they have a property in Zambia where they plan to develop a center for widows and orphans. He had a specific vision of how he wanted to develop the property, so I told him I could help him transform his vision into tangible products for promotional purposes. He teared up, and told me he was desperately looking for someone who could do just that. I asked him to sketch out his vision and send it to me. He sent this (image to the right):

Being a man of my word, but with concern that I may not have time in my schedule, I started working on his project after returning home. I quickly became consumed by this project! Kevin and I communicated frequently about details, and I sent him status updates. (see below) Kevin often called after receiving one of my updates and would say, “Dude! I’m totally blown away!”

Cottage

Runners often describe the “runner’s high” or “getting in the zone” feeling like they could run forever. This project was like that for me. I lost track of time, forgot to eat, stayed up late, and rose early to work on it. I ultimately designed the property layout in 3D, including the farm, cottages, service buildings, rooms, furniture, and colors. I also created designs for the assembly room, kitchen, cafeteria, living quarters for volunteers, and apartments for the supervisor and special guests… I got carried away!

Multi-Purpose Building

Kevin’s vision includes two large service buildings at the front of the property where they will feed, serve, and care for their inhabitants AND members of the surrounding community. My designs centered around simplicity and cost-effectiveness, applying basic rectangular shapes to buildings with simple roof lines. I wanted each building to have its own unique flair, so I designed one building with an open entryway including a large wooden cross suspended in the front, while another has an enclosed foyer with large windows that form the shape of a cross of the same dimension in negative space.

(front entrances of each multi-purpose building)

Part of Kevin’s vision is to partially power the community with solar energy, so the roofs are all designed for solar panel installation. The community will be self-sustaining, with a well and water tower, vegetable farm, chickens, bees, and partial solar power. There is an outdoor common area planned for recreation and gathering. While the farm and cottages will be primarily for the inhabitants, the two front buildings will be open to the public. There will be worship gatherings and education in the assembly building and a large cafeteria and kitchen in the other building for feeding the people living in the surrounding area.

The plight of the widows and orphans in Zambia is extreme. Kevin and his team are already doing amazing things. They have been feeding and caring for the locals by building a grain mill so that people would not have to travel so far to prepare their grain to make bread. The well and farm are already operational and growing food. One of the cottages is nearly finished, and another is under construction (as of the posting of this entry). Their vision and integrity captured my attention and energized me to pour my talents into this project. If you are looking for a worthy cause where you know your money is going directly to the need, please go to his web page and see for yourself: www.towerofstrengthministries.com

Posted in 3D Modelling | Tagged , , | Comments Off on This Project Consumed My Life

Gallery Highlight: Pet Portraits

Two Corgis

Two Corgis

I have been doing portraits for years, and animals got thrown into the mix along the way! Our beloved furry family members, sometimes called pets, are a delight to illustrate. Original art is a lovely way to remember those we have lost.

I have found the fur texture can be a challenge depending on the medium. As seen in the drawing of the two Corgis, fur is easy with pencils! I find the pencil much easier to control than wet paint. I have drawn many pencil portraits of animals, but one of my favorites which I, unfortunately, don’t have a picture of, was of a police officer and his K-9 unit. The German Sheppard’s hair was a blast!

Dalmatians

Dalmatians

I have highlighted three medium types in this post: graphite pencil, colored pencil, and oil paint. The colored pencil drawing of the Dalmatians had its own challenges. Achieving a realistic look and maintaining the form of the dogs while portraying the high-contrast coats on a white paper background was the tricky part with this one. All of these examples were commissioned work, but the Dalmatians were done for my brother-in-law. They dearly love their dogs, and this one was named “Heart” because of the heart-shaped black spot on her chest, which was a critical element to capture in this portrait.

Pit-bull oil portrait

DIXIE

Lastly is another dog portrait painted in oil. I stayed with my usual realism style with this one, and the fur and whiskers were quite challenging. The whiskers, in particular, require just the right consistency of paint and the perfect brush. My wonderful wife made a couple trips to the art store to get me the right tools. Painting with oils is more challenging for me than with a pencil. I changed the background color mid-way through the project, but this one turned out great in the end! Overall this was a great project featuring a family’s beautiful beloved Pit Bull.

I look forward to developing my oil painting skills with MORE pet portraits like this one. If you want to see more of my fine art drawings and paintings, click: HERE

Posted in Fine Art | Comments Off on Gallery Highlight: Pet Portraits

Ragnorok details (The Lunastell)

on the landing pad
full cut-a-way view
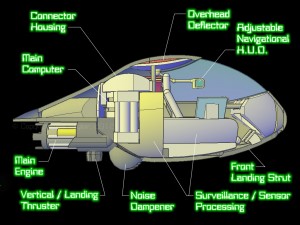
Before I design something in CAD, I have to flesh out the details. Here are a few details of the Ragnorok’s mid-ship: The Lunastell (see my last post). I will more than likely enhance this model with secret compartments for various spy-type hardware that the twins utilize in their missions. These are quick screen captures without lighting. I hope to do that shortly. ENJOY!
right side viewleft side view
iso view

Posted in 3D Modelling | Tagged , | Comments Off on Ragnorok details (The Lunastell)

The Ragnorok

This piece I pulled out of my portfolio is not something on which I am currently working. Although the last image represents a rendering done after adding  simple lighting and textures, I am showcasing this piece because it represents a milestone in my model-building skills.

It started in 1981-82 while a good friend and I were brain-storming, doodling, and writing about our comic book concept. We formulated a HUGE 10-member hero team. While certain team members had individual flight capabilities, others did not, so we created cool ships for them to fly. This unique design accommodates five team members in three individual crafts that can link together to form one large ship.

Combatra: property of Marvel Comics

During the design process I had certain characters in mind such as an eight-foot-tall pilot in the large aft ship while the spy twins occupied the mid-section. Looking carefully at the ship one can see the 1980s design influences, notably: Star Wars, Battle of the Planets, and Marvel Comics’ Shogun Warriors. I was particularly fond of Combatra.

As soon as I started using CAD in the mid-80s I wanted to model this ship! It proved to be a formidable task as the tools and my skills were not up to par, as seen in the 1996 version of this project. Within the last year, after getting up-to-speed with more advanced modeling skills, I have fabricated a full-size 3D model of one of my favorite ships.

1996

2011

Each section can function autonomously, having its own propulsion, weapons, and guidance systems. The fore-ship, the Freebird, with its smooth design, low profile, and heavy out-board engine is designed for speed. The armaments include two embedded chain guns able to fire an assortment of projectile-based or energy-based rounds depending on the cockpit configuration. There are also two extendable launch platforms with 30 deployable missiles stowed on-board. The missiles can be configured for various uses before being loaded into the ship. The “skids” on the back are specifically for cradling the mid-ship and includes retractable docking nozzles. The Freebird also has a full communications array with basic tracking and detection capabilities, countermeasures, and limited deflector defenses.

The mid-ship is the Lunastell. Its tiny footprint, radar-deflecting skin, quiet running engines, and noise dampeners allow the Lunastell to execute stealth missions effectively. The ship serves as an extension of the spy-master abilities of the twins. The cockpits of each pod have highly advanced tracking and detection capabilities as well as advanced communications and super-computing hardware, (not shown). Data and communications between the two pods link via the connection arches in the middle. Specialized equipment is stored in secret compartments and the armaments include two spread-fire lasers mounted on the underside of each wing with two Vulcan cannon turrets.

The aft-ship is the Albatross. This massive craft is most notable for the four huge engines required to propel the three ships in their combined form (the Ragnorok). It also houses the largest member of the team as its pilot (as mentioned before). The nose is a large docking clamp that grasps the mid-ship in the combined phase and can fold shut when not in use. The large deployable landing pads in the back give the Albatross and the Ragnorok, when combined, VTOL capability when needed. The cockpit design allows the pilot to slide back into an instrumentation-only mode that provides extra shielding. In normal mode the cockpit can store extra equipment or temporarily transport one additional passenger. This vessel is heavily-armed with three wing-mounted Gauss cannons, a rear-facing Vulcan cannon, smart-bombs, and the largest weapon on board—the formidable rail gun which is lowered down from the belly of the ship during deployment. Defenses include heavy armor and mild deflectors.

While in combined mode, data and communications flow throughout the Ragnorok via data ports embedded in the docking clamps and surfaces. The Lunastell acts as the “brain” of the Ragnorok, and the other two ships cannot combine without it. Advanced systems in the Lunastell take control of communications, computing, tracking, and detection routines of the other two ships while in combined mode. Various armaments go offline, and the spread-fire lasers have less rotation due to the wing combination. Primary control of the spread-fire lasers also transfers to the aft-ship pilot to allow the mid-ship members to focus on surveillance and analysis tasks. The navigation priority is then routed to the Freebird. The main thrusters of the Freebird and Lunastell go offline while navigational thrusters remain active and leave the Albatross with main propulsion priority.

As you can tell, I am having WAY too much fun with this, but what can I say?

Posted in 3D Modelling | Tagged , | Comments Off on The Ragnorok

IT IS FINISHED!

The details in the foreground of the various plants and flowers proved to be very time-consuming, indeed. One of the biggest challenges was matching colors that I had applied two months prior. Having never had any formal training in the fine arts I need to “level-up my alchemy skills” as they would say in the gaming world (i.e., teach myself color theory). I was a little jittery about the relief effect because I was unsure how my idea on tinting the existing wall color was going to work out. It was meant to be subtle but noticeable,  I believe it worked.

Well, what else to say that I have not already said. This has been a WONDERFUL experience and I am GRATEFUL to Larry and Nancy for their patience throughout this project. As you can see in the pictures, life went on in their living room while the main wall was covered in paint, paper, and tape for several months. Quickly welcomed into the Plympton home and treated as part of the family, rights to the fridge were given and it became customary for me to grab a glass of diet root beer. At times, I was  isolated in my world with headphones on and other times engaged in the festivities such as catching up on their favorite shows on the DVR – “Top Gear” ROCKS! Such are the joys of working for friends!
So Here it is.

Posted in Fine Art | Tagged , , | Comments Off on IT IS FINISHED!

Plympton Mural, Part 5: Photo Update

As Nancy said last Saturday: “We are seeing light at the end of the tunnel.” Thanks so much for visiting!

Posted in Fine Art | Tagged , , | Comments Off on Plympton Mural, Part 5: Photo Update

Plympton Mural, Part 4… The Bridge to Nowhere

Sorry for my latent blog. I had hopes to make this a 4-post project, but that isn’t possible due to my recent adventures exploring my other passion- plumbing…(not). After two weeks of work (nights and weekends) that included five days without running water, $360 to a plumber that did not help at all, 4-5 trips to Lowe’s, dozens of phone calls, and two trips to Brevard County to obtain the extremely rare parts needed to fix a 1hp Sta-Rite ProJet pump. And after taking said pump apart twice; we now have running water. We are still troubleshooting the lack of pressure in the system and still need to install final changes to the wellhead, but I was finally able to get back to the Plympton house and paint.

As a compensatory bone, I am throwing in these two pictures of the bridge in progress: (and yes, it appears that the bridge leads to a void, but I will fix that – I promise)

Posted in Fine Art | Tagged , , | 1 Comment

Plympton Mural – Part 3

First – PICTURES! PICTURES! PICTURES! My wife said: “More PICTURES!”  So, here you go. The first two shots are of the background in progress before and after the house was placed in the scene.


The pencil works I do are easy because they are usually compact and, if I mess up, I can erase or, worse case, tear it up and get a new piece of paper.  But this…this is someone’s WALL – in their house…it’s HUGE, and you can’t tear it up and start over. The lake is a BIG part of this composition, and I knew that to mess it up was equivalent to “buying the farm”. Mistakes are not an option. Small ones yes, like the issue I had with the house earlier. Those are the kinds of thoughts and anxieties that were zooming around in my head as the time to paint the water in the lake approached. I began studying water everywhere! There is a similar lake in Winter Park at Lake Island Park where I went for lunch on many days and took pictures to study the colors, reflections, and the wind effect on the lake. I was ready! Using the texture of the wall to help with the wind effect and a half-loaded fan brush in my hand, I applied the paint and at once went into CARDIAC ARREST. It looked like a second grader smeared green paint all over my beautiful blue lake! Within a moment I had to produce a new plan. I grabbed a smaller brush and other colors of paint and started repairing the insanely fast-drying vomit on my mural, resulting in one of the most successful sessions of working on this project.


There is tweaking left to do, along with more reflective water in the foreground coming soon, but I am pleased with how it turned out.

Posted in Fine Art | Tagged , , | 1 Comment

Plympton Mural, Part 2

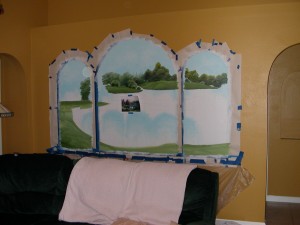
So, the first image is of the wall right after the arches were transferred and masked off. I then applied primer inside the arches. After that dried, it made perfect sense to construct the enlargement grid, which was about the time I realized how nervous I was about this project. After determining that it would work best to paint from the background forward, I promptly painted over most of the enlargement grid with sky, water, and grass.

Once the enlargement grid was retraced it was time for the real fun to begin! What followed was hours of mixing colors, applying the color, FREAKING OUT, and remixing the color to try again. Finally, the background was forming, and I was picking up momentum. Now that the project was about a third of the way finished, I felt like I had a plan that was working. Then I hit the first snag…

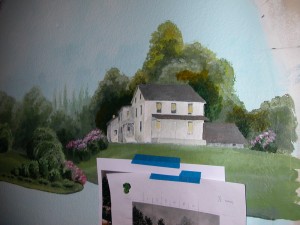
The scene has a white farmhouse sitting on a hill in the background. The first time the house was blocked onto the hill it seemed too big. It was a Saturday, and I had other stuff to take care of at home, so I asked Larry and Nancy (the clients) to look it over through the rest of the weekend and let me know how they felt next time I came out. We agreed that the house was too big so, I had to concoct a way to shave it down.

This image shows the house in progress after it was reduced. The weird color blotches show how I used the tree color behind the house to push the edges inward, making the house smaller.

Next week I will share about the highly intimidating process of painting the water in the lake.

Posted in Fine Art | Tagged , , | Comments Off on Plympton Mural, Part 2

Plympton Mural project begins

My first post is a project I did for a friend and colleague who wanted a mural in their living room. This is a challenging project since I have only painted one other mural. That project was a team effort where we painted English garden flowers on the walls of a large church fellowship hall. I must have contributed to that project before cameras because I have no pictures! Recently I found out that they dry-walled that entire room thereby hiding my first mural until the post-apocalyptic archaeologists dig it from among the rubble.

There will be several posts on this current project since I am taking pictures of each step. My friends, the Plympton’s want three archways looking out at a beautiful garden scene. My first step was to take measurements of the wall. I then did what I often do when trying to figure something out, what any art geek with NERD SKILLS would do, model the wall and arches in AutoCAD.

CAD model with dimensions

CAD model with dimensions

Using the geometry in the CAD model, I configured the arches on the wall using a tape measure, T-square, level, and string.

Since we (the clients and I) were working from several references to build the final scene, I drafted a scaled-down version of the wall in my

Sketch of scene

Sketch of the mural scene

sketchbook and produced a pencil rough of the scene. Once the design was approved, I applied a grid to the sketched scene to transfer it onto the arches on the wall.

Next time I will post more pictures of the work-in-progress.

Posted in Fine Art | Tagged , , | Comments Off on Plympton Mural project begins