• Don't miss December 2014 By Design Newsletter!

    In this edition, you will find new products information, links to the latest webinars and tutorials, dates for workshops in UK and Germany and more! Enjoy!

    Learn More

    • Sun, Dec 22 2019
  • Sign up for a CorelDRAW Graphics Suite 2017 Workshop for Printers & Signmakers - 30th and 31st August 2017

    The Digital Academy Coalville, Leicestershire, UK

    Suzanne Smith, from Corel,  will run through a day training on Corel's latest and most innovative graphic design program yet, which comes with cutting-edge features to help you create beautiful designs, graphics, photos with both ease and confidence. The Level 1 course is aimed at providing new users, or those upgrading from older versions, to quickly become familiar…

    • Thu, Aug 17 2017
  • The Tip of the week: Getting real-world dimensions with your on-screen display

    Did you know that CorelDRAW can be setup to display objects at their actual size on screen? If you’ve ever had the need to ensure the object on your screen is exactly the same size it will be in real life -- for example, a 2” x 2” square that measures exactly 2”x 2” on your monitor – here are the steps. 

    First, you’ll need to do some physical measuring to get it working. Start by…

    • Wed, Nov 16 2016
  • The Tip of the Week: Create your own Print Color Palettes, a must in the printing and sign industry!

    If you're in the printing or sign industry, you may find it helpful to create and print your color palettes to get a real-world color chart for proofs or color matching. In CorelDRAW X8, install Color Chart Creator in the GetMore docker (Tools>Docker>Get More) by selecting Extensions under the Tools tab. If you're running an earlier version of CorelDRAW, you'll find the Color Chart Creator already installed.…

    • Tue, Nov 8 2016
  • Joe Diaz, sign shop/design agency owner & CorelDRAW Master, at Sign World International: don't miss him!

    Join Joe in Atlantic City in two training sessions:

    December 2, 2016 - 1:15 – 2:45 pm: Custom Lettering effects in CorelDRAW
    December 2, 2016 - 3:00 – 4:30 pm: Create & Sell Logo Designs using CorelDRAW

    Register 


    • Mon, Nov 7 2016
  • New Tutorial: Create Double Exposure effects using Corel PHOTO-PAINT X8 By Stefan Lindblad

    In this tutorial, you will learn with Stefan Lindblad, artist, freelance illustrator, graphic designer and CorelDRAW Master how to create an impressive double-exposure effect in Corel PHOTO-PAINT X8, using double-exposure and collage techniques. The techniques used include using object merge modes, object lenses, background erasure and various enhancement tools.

    Learn More

    Note: this tutorial  is available in 11 languages…

    • Thu, Nov 3 2016
  • The Tip of the Week: Save time and space with externally linked images

    Working on a multi-page document in CorelDRAW that includes a large number of high-resolution images can be a daunting task. When too many large images are used in a document, there are many complexities involved. It may take a longer time to navigate between pages, cause slow file opening, and other potential issues.
    This can be avoided by using externally linked images, instead of directly importing the images into the document…

    • Tue, Nov 1 2016
  • New webinar: Learn how to create a workflow that combines CorelDRAW X8 with Corel AfterShot Pro 3 and Corel PaintShop Pro X9

    David Milisock, President of Custom Graphic Technologies, explores optimizing the workflow between CorelDRAW Graphics Suite X8, Corel AfterShot Pro 3 and Corel PaintShop Pro X9 and shares his best practices. Topics covered in this webinar include:
    - A review of color management setup in the 3 programs
    - Extracting images from CorelDRAW into Corel PHOTO-PAINT and correct color converting with Corel PaintShop
    - Converting…

    • Thu, Oct 27 2016
  • The Tip of the Week: Create your customized font categories

    I've created my own customized font categories (collections) in the new Corel Font Manager X8 and made sure every font belong to at least one of those categories.  Being able to filter out all other fonts but the style of font I need is a huge time saver.  My font  categories are as followed:
    *Favorites (I placed an asterisk next to this one so that it remains at the top of my categories), Beveled/Engraved, Condensed…

    • Tue, Oct 25 2016
  • The Tip of the Week: Contour with round/beveled corners

    When you apply a contour to an object, by default CorelDRAW will apply Mitered corners to it. There are two other options available to choose other than Mitered; Round and Bevel. When a contour object is selected, you will see   button on property bar. Clicking on the button will reveal options to toggle between Mitered, Round or Bevel corners.

    Tip provided by Pratik Shah, CorelDRAW Master, graphic designer

    • Tue, Oct 18 2016
  • New tutorial: Managing fonts with New Corel Font Manager by Anand Dixit

    Managing fonts has never been easier, thanks to the new Corel Font Manager included in CorelDRAW Graphics Suite X8. In this tutorial, Anand Dixit, CorelDRAW Master, graphic designer and trainer will show you how to work with the Corel Font Manager to install, uninstall, and filter fonts, as well as creating unique font collections that will help you to find and access specific sets of fonts in seconds.

    Learn More

    • Thu, Oct 13 2016
  • The Tip of the Week: WhatTheFont?!

    The "WhatTheFont?!..." feature is a huge time saver for anyone trying to match the lettering from customer provided art.  Simply go to Text -> "WhatTheFont?!...", then drag a box over the lettering you want are wanting to match then click within that box and the "WhatTheFont?!..." system will begin on your default browser.

    Tip provided by Joe Diaz, CorelDRAW Master, Graphic Designer…

    • Tue, Oct 11 2016
  • The (Video) Tip of the Week: Give your photos more depth with the Unsharp Mask and Vibrance Lenses

    www.youtube.com/watch

    When you have a photo and you’d like to quickly add depth to certain details in the photograph (such as a warmer color while keeping the rest of the photo intact), simply use these quick steps. First open your photo in Corel PHOTO-PAINT.

    1) Use the Unsharp Mask Lens to sharpen the photo. (Click on the New Lens icon at the bottom of the Object Manager docker and select the Unsharp Mask lens…

    • Tue, Oct 4 2016
  • The Tip of the Week: Pop Art in 4 easy steps

    1. In CorelDRAW convert your bitmap / photo to Grayscale (Bitmaps > Mode > Grayscale (8-bit)).
    2. With your photo selected, click the Edit Bitmap button on the Property Bar.
    3. Run the High Pass filter.  (Effects > Sharpen > High Pass).

    Use a high Percentage and Radius to bring out the subtle detail in the image.
    The High Pass filter introduces more detail than the normal Threshold Conversion method.

    4…

    • Tue, Sep 27 2016
  • Free CorelDRAW Training : CorelDRAW X8 Essential Training by Roger Wambolt on Lynda.com

    Learn with Roger Wambolt the essential tools and techniques you'll need to create expressive art and designs with CorelDRAW X8, the powerful graphics application.
    This series of 64 videos runs for 3 hours and 45 min. and will take you through the basics of CorelDRAW X8. What makes this even more appealing is the fact that Lynda.com is currently running a 10-day free trial. What does this mean? If you spend just…

    • Fri, Sep 23 2016
  • The Tip of the Week: Constraining the Angle of Rotation

    Press and hold the Ctrl-key while rotating an object to constrain the rotation by increments of degrees. The Default Constrain Angle is set at 15.0 degrees yet you can easily set the degree of rotation under Options > Workspace > Edit > Constrain Angle.

    Tip provided by Richard Reilly, Graphic Designer and CorelDRAW Master.

    • Tue, Sep 20 2016
  • The Webinar of the month: Easiest and quickest ways to create text and color options in CorelDRAW by Anand Dixit

    Whatever the design, many times your client will ask for an alternate color scheme or additional options for fonts and text attributes. In other cases, you may want more options for your design. Spending time creating these options manually can add hours and additional costs to your project. Instead, why not use “Styles” in CorelDRAW? In this webinar, Anand Dixit, CorelDRAW Master, graphic designer and trainer will show…

    • Thu, Sep 15 2016
  • The tip of the Week: Quickly add a Colored Photo Filter effect in Corel PHOTO-PAINT

    What is so great with Lens Objects in Corel PHOTO-PAINT, are the various non-destructive Lens Object features. When you want to turn your photo into a vintage-looking photo, or just add any color to give it an interesting look, you simply follow these easy steps
    Open your photograph in Corel PHOTO-PAINT. Go to any docker and click on the Quick Customize button, or go via Windows > Docker > Object Manager docker

    • Tue, Sep 13 2016
  • The Tip of the Week: Spinner Buttons

    Spinners, or spin boxes, are used to specify values by typing or clicking the up or down arrows.   If you hover your mouse in between the up and down buttons you can click & drag to change the numerical values. The farther you drag the higher or lower the value changes.      

    Hover with the curser between the two arrow head icons (up and down buttons).

    When the curser changes to the Spinner Curser, left mouse-click…

    • Tue, Sep 6 2016
  • New tutorial : The Black in CMYK printing By Ariel Garaza Díaz

    The importance of getting the color black right in any printing job should not be underestimated. In this tutorial, Graphic Designer and CorelDRAW Master Ariel Garaza Diaz, brings light to this subject, explaining the difference between Pure Black and Rich Black, CMYK vs. Pantone black and why overprinting black is so important. We will also learn the importance of black in achieving richer tones when printing fountain…

    • Fri, Sep 2 2016
  • The Tip of the Week: Quick navigation through the pages in multi-page document

    When you work with multi-page documents you can quickly switch between pages by pressing the "Page Up" key to advance to next page, and "Page Down" key to return to previous page.
    When you are on the first page, pressing "Page Up" (or when you reach last page, pressing "Page Down"), opens the dialog box to insert new pages (before or after the current page).

    Tip provided by Silvio…

    • Tue, Aug 30 2016
  • August By Design newsletter is here!

    In this edition, you will find the latest products information, the new CorelDRAW resources and all our upcoming events!

    Learn More

    Subscribe Now

    • Thu, Aug 25 2016
  • The Tip of the Week: Flip an image and object to duplicate in Corel PHOTO-PAINT

    To create a duplicate object by flipping it, use this this nifty tip. It requires you go to Tools > Customization and under Customization in the Options panel, choose Commands. Click on the Search icon and search for Flip, and Horizontally, then Vertically. Add those two icons to your Property bar or Toolbar. Or, you can go via the Menu: Image > Flip or Menu: Object > Flip

    Tip provided by Stefan…

    • Tue, Aug 23 2016
  • The Tip of the Week: Pan Tool (H)

    The Pan Tool (H), allows you to drag your view of the document in any direction at the current zoom level. The hot key for the Pan Tool is (H), but you can also access the Pan Tool by pressing the mouse wheel. 

    Tip provided by Richard Reilly, Graphic Designer and CorelDRAW Master

    • Tue, Aug 9 2016
  • The Tip of the Week: How to check the Text Statistics in CorelDRAW

    Knowing the text statistics (number of words, paragraphs and characters, for example), is very useful when preparing books, newspapers, brochures, etc., where text always occupies the same space.
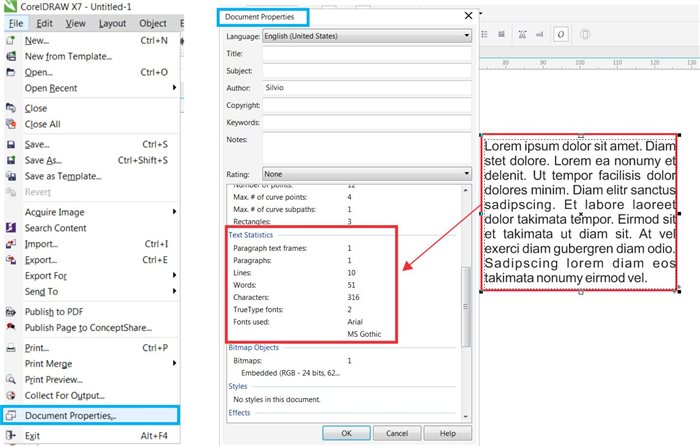
    Select the text (Artistic or Paragraph modes), and go to: File > Document Properties.
    A pop-up window opens showing the text statistics.

    Tip provided by Silvio Gomes, CorelDRAW Master, Artist and Graphic Designer.

    • Tue, Aug 2 2016